
SimplyCam V3. Documentation
- SimplyCam V3
- Interface
- Toolbars
- Vectorization
- Settings
- Toolpath Manager
- Mill Toolpaths
- Laser, Plasma, Waterjet Toolpaths
- Lathe Toolpaths
- Mill tutorials
- Laser, Plasma, WaterJet tutorials
- Lathe tutorials
Edit Toolbar
The following SimplyCam functions allow you to edit existing entities.
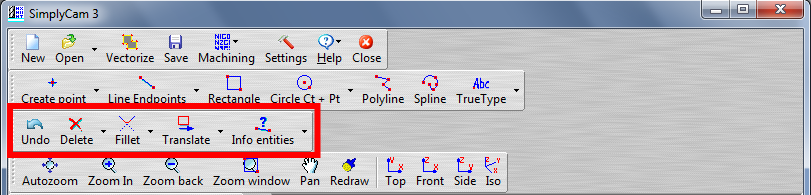
Undo
The Undo command allows you to cancel the last command executed and restore the previous state.
Delete menu
The Delete menu gives options for deleting entities and recovering deleted entities.
To access a function, select it from the dropdown list.
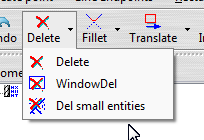
Delete
Use this function to remove one or more selected entities from the graphics window.
To delete entities:
- Mouse click on the entities you want to delete.
- Right mouse click, the dropdown menu show up.
- Click on Done.
WindowDel
Use this function to remove one or more entities inside the defined window.
To delete multiple entities within window:
- Use the mouse to sketch the window corners.
- All entities within window are deleted.
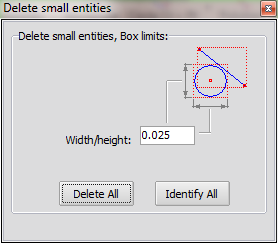
Delete Small entities
Allow to delete small entities (ex. noise of vectorize process).
Edit menu
The Edit menu gives options for modifying entities.
To access a function, select it from the dropdown list.
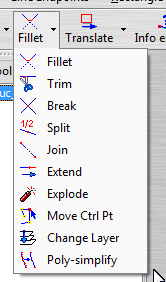
Fillet
The fillet function create an arc of a defined radius tangent to the entities.
To create fillet:
- First set the fillet radius on the fillet dialog.
- Select two entities (linee and/or arcs) close to the fillet zone.
- The selection point determine where is createt the fillet.

The lines are trimmed to tangent filled position, when the arcs are breaked to tangent fillet position (you can delete the unused portion).
Trim
The trim function gives you options for trimming entity to one another.
To trims two entites to their intersection:
- Select a line or arc as the first entity.
- Select a line or arc as the second entity.
- The selection point on the entity determines which part will be maintained.
Break
The Break function gives you options for breaking entities at their intersections with other entities.
Extend
The Extend function gives you options for extending or trimming an entity by a defined length.
To extend an entity:
- First set the value for length on the extend dialog.
- Select a line or arc close to the endpoint that you want to extend or trim.
Note:A positive value extends the entity, a negative value decrease the entity.
Explode
The Explode command allows to change a grouped item into its individual elements, so it can be edited or machined.
You can Explode a Block into its base entity, a Rectangle and Polyline into Linee.
Move Control Point
This function is used to move the control points.
To move the control points of an entity:
- Select the entity you want to edit.
- Drag with the mouse one or more of the control points.
- To end, right mouse button and press Done or Cancel from the dropdown menu.
Change Layer
The Change Layer function gives you options for moving entities between layer.
To change the layer of entity:
- First set the target layer in the dialog.
- Select one or more entities to move to the target layer.
Poly Simplify
Polyline simplify reduce the number of vertices, saving storage and subsequent processing costs.
To simplify a polyline:
- First set the tolerance value in the dialog.
- Select one or more polyline.
Xform menu
The Xform menu gives options for translating, rotating, mirroring, scaling and offsetting entities.
To access a function, select it from the dropdown list.
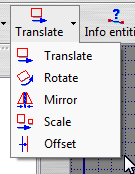
Translate
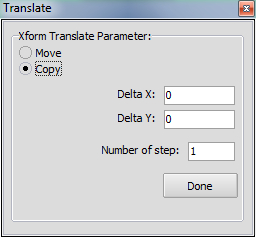
To translating entities:
- Select one or more entities you want to move and press Done from the drop down menu. In alternative, use "Window select" with related status-button activated.
- Select Move or Copy in the "Translate" dialog box.
- Enter a value for number of steps in the dialog box.
Dynamic option:
- Snap with the left mouse the "Base point".
- Drag with the mouse to define the translation vector (from "Base point" to "New point") and confirm with the click of a mouse.
Static option:
- Define the translation vector in "DeltaX" and "Delta Y", and then press the "Done" button in the dialog box.
To interrupt the Translate operation, click the right mouse button and select "Cancel" from the drop-down menu, or press Esc keys.
Rotate
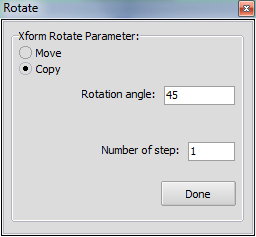
To rotating entities:
- Select one or more entities you want to rotate and press Done from the drop down menu. In alternative, use "Window select" with related status-button activated.
- Select Move or Copy in the "Rotate" dialog box.
- Enter a value for number of steps in the dialog box.
- Snap with the left mouse the center of rotation.
Dynamic option:
- Move the mouse to define the angle of rotation and confirm with the click of a mouse.
Static option:
- Insert the angle of rotation, and then press the "Done" button in the dialog box.
To interrupt the Rotate operation, click the right mouse button and select "Cancel" from the drop-down menu, or press Esc keys.
Mirror
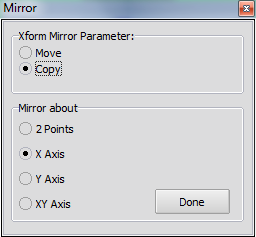
To mirroring entities:
- Select one or more entities you want to mirror and press Done from the drop down menu. In alternative, use "Window select" with related status-button activated.
- Select Move or Copy in the "Mirror" dialog box.
Axis X, Axis Y or Axis XY option:
- Set the mirror axis, and then press the "Done" button in the dialog box.
"2 Points" option:
- Snap with the left mouse the first point of mirror axis.
- Snap with the left mouse the second point of mirror axis.
Scale
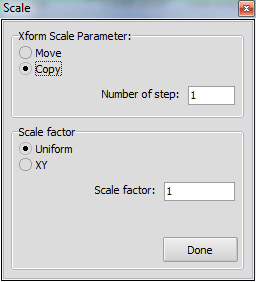
To scaling entities:
- Select one or more entities you want to scale and press Done from the drop down menu. In alternative, use "Window select" with related status-button activated.
- Snap with the left mouse the reference point. The entities will be scaled relative to this point.
- Select Move or Copy in the "Scale" dialog box.
- Enter a value for number of steps in the dialog box.
- Define the type of scaling (Uniform or different factors along the X and Y).
Dynamic option:
- Move the mouse to start the scaling or define the scale factor.
Static option:
- Insert the scale factor, and then press the "Done" button in the dialog box.
To interrupt the Scale operation, click the right mouse button and select "Cancel" from the drop-down menu, or press Esc keys.
Note:
A scale factor greater than 1 enlarge the entities.
A scale factor less than 1 shrink the entities.
A scale factor equal to 1 produce no change in size.
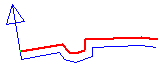
Offset
Offset is the function to create entities by a distance in a perpendicular direction.
To offsetting entities:
- Select Move or Copy in the "Offset" dialog box.
- Set the offset distance in the offset dialog.
- Select entity you want to offset.
- A red offset entity with arrow direction, is show up in viewport.
- Use "Flip dir" button to change the direction.
- Click on "Done" button to accept the offset result.
Info menu
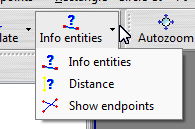
Info entities
This command is used to get info from entities.
The dialog window show first the limits and the count of all entities.
Distance
This command is used to analyzing the distance and angle between two points.
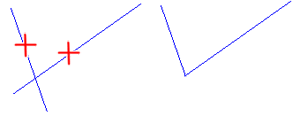
Show endpoints
This command is used to view the endpoints of all visible entities. This is useful for determining the boundaries of an individual entity.
Copyright ©2015 MR-Soft - SimplyCam version 3.0.6 - Help file built on 12/08/2015